
As soon as we saw photos of the Pac-Audio RadioPro5, we knew we had to get our hands on one (or three)! When they finally became available, I ordered our first RPK-GM4101 from Phastek Performance; apparently it was the last kit they had in stock. The second one was ordered by Greg from Double D Mods, as a package deal, with the Kenwood DDX 9903S.
(note: The Pac-Audio kits, and Kenwood head units, arrived and were ready to be installed on the 24th of last month, however we ran into a few issues that needed to be resolved before we could complete this write-up.)
Jump to a section:
- First Impressions
- Installation & Tips
- Steering Wheel Controls (SWC) & Firmware Update
- Issues Found
- Useful Links
- Final Thoughts
First Impressions:
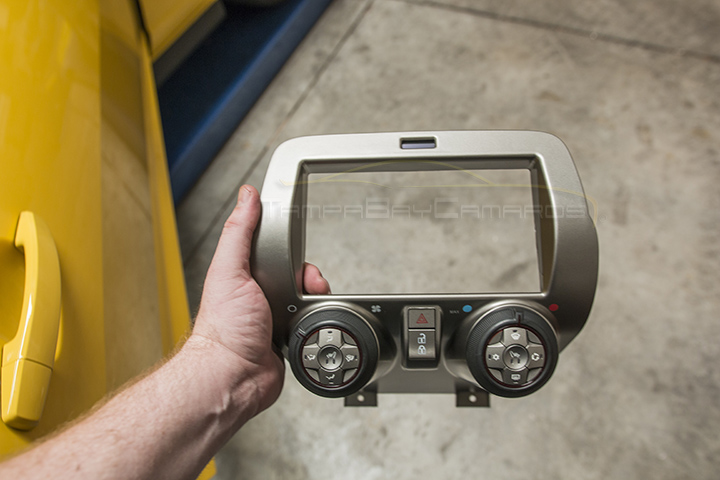
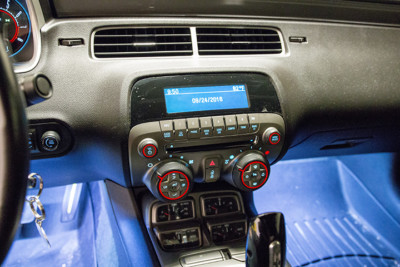
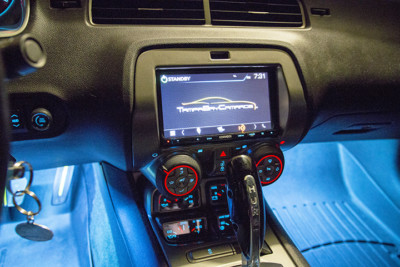
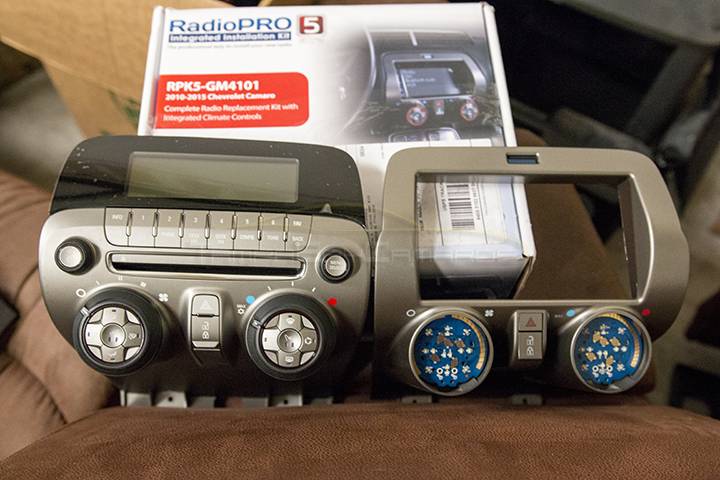 Upon removing the factory head unit from my 2011 Camaro, it was instantly noticeable that Pac-Audio spent a good amount of time engineering this kit. The footprint. design and color of the RadioPro5 is nearly identical to the GM faceplate. The HV/AC control knobs, door lock controls and hazard buttons are all located slightly lower than the originally factory locations.
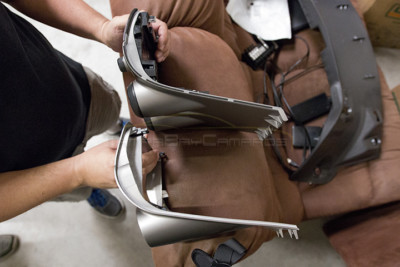
The slightly lowered controls don’t take anything away from the appearance of the kit, however it poses a bit of a challenge, for those of us with the lower gauge pack, when reinstalling them after the Pac kit is in place. (There is a useful trick you can use to make things a bit easier, but we’ll get to that a bit later.)
| Side View: OEM Faceplate / RadioPro5 | Rear: RadioPro5 / OEM Faceplate |
|---|---|
 |
 |
The only issues that are immediately noticeable are the plastic used in the kit faceplate, the door lock, unlock, and hazard buttons. The plastic feels a bit brittle, but at no point during installation, or use, would you apply enough force to break the faceplate. We installed and removed the unit twice and there were zero issues. The door lock and hazard buttons, on the other hand, are extremely disappointing… Unfortunately, there’s no way to sugar coat it; they’re the worst part about this kit. The lock/unlock buttons don’t feel as ‘springy’ or as responsive as the OEM buttons, and the hazard button feels like it’s already pressed in because there’s no movement/spring to it.
It’s clear that PAC set out to make the kit that 5th gen owners have been begging for, and it’s too bad that little things like these prevent it from being amazing… There is hope, though. Pac-Audio seems to be listening closely to customer feedback, so hopefully an updated version will be available soon (for those of you who have the will power to wait for it.)
That being said, one of the most impressive things about this kit is what’s included. Not only does it include a beautifully designed bezel that allows us to retain the factory heater and air conditioner control knobs, it includes nearly everything you’ll need for a standard aftermarket head unit installation. That’s right; no need to purchase an antenna adapter, an adapter to connect a factory backup camera, or an adapter to retain the factory USB / AUX ports… it’s all there. (or, at least, it should be.)
The full contents of the RadioPro5 (RPK-GM4101) are as follows:
- Dash Kit
- PAC HVAC Control Panel
- Radio Mounting Brackets
- Pocket (For single DIN radio installaation)
- Radio Mounting Screws
- RP5-GM4101 (Camaro specific radio replacement module)
- CMX Chime module
- Antenna adapter (BAA-DIN22).
- Rear camera retention cable for vehicles equipped with the MyLink system.
- USB retention cable. (for USB equipped Camaro)
- AUX retention cable (for 2010-2012 vehicles equipped with AUX port.)
Note: Our first two kits did not come with the CMX chime module, so we had to contact Phastek Performance & Double D Mods to have them sent. Phastek was contacted twice, and it took nearly 2 weeks for the module to arrive, while Double D Mods responded immediately and had Pac-Audio ship the missing module directly to us; which only took 2 days.
Installation & Tips:
If you’ve never replaced a factory head unit before, lack patience, or are easily intimidated, you’ll probably be happier if you have a local professional to handle the installation for you.
The installation process can seem a bit daunting; especially after looking through the instruction manual and staring at all of the wiring harnesses….. Not to worry, though, if you have the ability to follow instructions, take it slow, and double check your work as you go, you shouldn’t have much trouble.
The PAC instructions are fairly straight forward, but there are a few bits of information that we learned during the 1st installation that would have been extremely useful to know ahead of time, but we’re about to share them with you now.
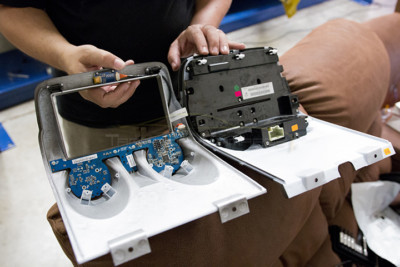
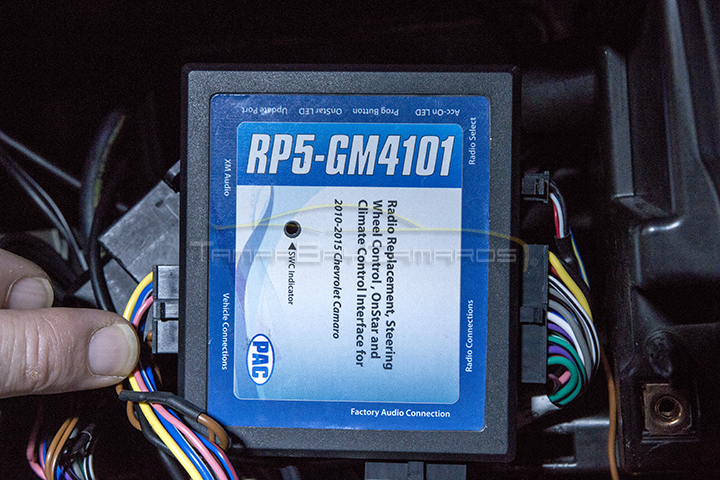
First, and probably the most useful thing we learned was this: Extend the control module wiring harness! Extending the wires that connect the module harness to the factory harness, and wires from the control module to the radio wire harness will. If thes will allow you to slide the new radio in into the factory location easier, and tuck the control module further into the dash without leaving a giant bundle of wires wedged behind the head unit. Extending the wires will also allow you to place the control module somewhere that you’ll have access to if you need to update the firmware or reprogram any of the steering wheel controls.
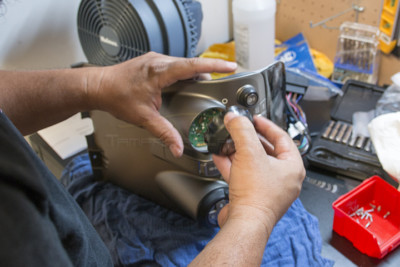
You’ll need to see the LED on top of the module, and have access to the program button while reprogramming the steering wheel control functions. For firmware updates you’ll also need to access the port on the side of the module to connect the PAC-UP programmer… it’s right next to the program button for the steering wheel controls.
 We found that cutting the plastic “bump out” behind the radio wasn’t necessary when installing the Kenwood DDX9903S head units in a non-MyLink camaro; especially if the wires were extended on the PAC module wire harnesses. Trimming a bit off of the the plastic guide tabs, on either side of the head unit location in the dashboard, was necessary for 2 important reasons. First, to allow the PAC faceplate bezel to sit completely flush against the dashboard, and second, to prevent the temperature display wires from being crushed, pinched or otherwise damaged during installation. (Note: Head units may be deeper than the Kenwood DDX9903S that we installed, and 2013-2015 MyLink equipped Camaro’s may be different, so cutting the plastic bump may be necessary in those instances.)
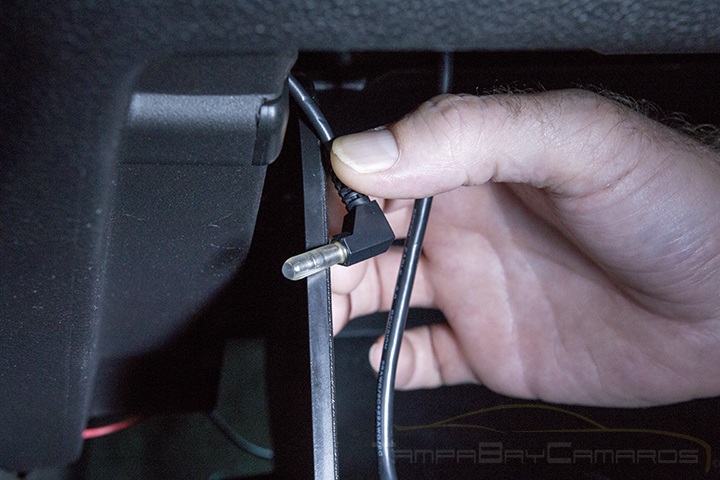
If you’re installing a Kenwood or Newer JVC head unit, you’ll be connecting the Blue/Yellow wire for steering wheel control functions, NOT the 3.5mm connector. (see page 4 of the PAC manual) With that being said, be absolutely sure that the 3.5mm connector retains the insulator cap that should have come pre-installed on it. (see pic) If the 3.5mm connector is exposed, and becomes grounded by coming into contact with bare metal behind the radio, you will lose all steering wheel control function. We strongly suggest wrapping it with electrical tape, and securing it with tie wraps or zip-ties, just to be sure it never becomes grounded. If you’re installing an Alpine, Clarion, Pioneer, Sony, Dual, Lightning Audio, Jensen, an older JVC, or similar head unit that utilizes the 3.5mm connector, be sure to cap the Blue/Yellow wire to avoid a similar situation.
Cut the brown loop wire! There’s a note on page 5 of the installation manual that shouldn’t be ignored: “The Mute loop (if not cut) will turn the accessory output off when an OnStar or Bluetooth call is made or received. If the aftermarket radio has a mute input cut this loop and connect the outer brown wire to the mute input.” — In short, CUT THE WIRE if you don’t want the new head unit to shut down / restart if you use OnStar, or make Bluetooth calls.
A final tidbit of useful info to have during installation would be to pop the traction control button and cigarette lighter power socket up, out of the gauge panel before trying to reinstall it into the center console. With both the TC button and socket out of the way, you’ll gain precious space between the shifter plate and the gauge pack, allowing you to slide it under the PAC kit and back into position. (it’s a very tight fit, but it fits.)
Steering Wheel Controls (SWC) & Firmware Update
 After getting the head unit and PAC control module wired up, and the radio connected, it was time to test the steering SWC. The default settings worked, however the Answer/Voice button activated OnStar, and to be honest it scared the crap out of us, because it was so LOUD!! Pressing it once was all it took; we knew it had to go. (After all, we could always activate OnStar via the factory mirror if we ever needed to.) The default settings also didn’t have the ability to activate Google Voice (Android Auto) or Siri (Apple Car Play), so we thumbed through the instructions and began carefully reading through page 6, to learn how to reprogram the SWC.
Unfortunately, no matter how many time we tried, the module would not enter program mode. Until we contacted and got an answer from PAC about the issue, we had to deal with the default settings; so we finished installing the head unit and dash kit.
The following day I heard back from Pac-Audio support (Support@aampglobal.com). The response was: “…you should be able to manually program the sw buttons. Have not heard that is an issue.
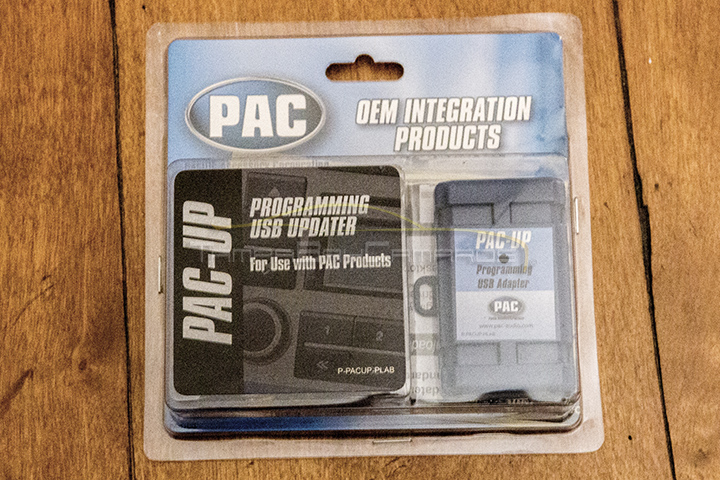 Since Pete, a fellow club member, was purchasing the same head unit and kit from a local shop / pac-audio dealer, we asked him to discuss the issue with them once the install was complete… Sure enough, they ran into the exact same problem. Luckily, Dean (the installer at 5 Star Car Stereo) was able to get in touch with PAC, and they sent one of their engineers out to take a look at the issue. As it turned out, it was a software issue and they were able to update Pete’s module with a new firmware version and get the steering wheel controls programmed how he wanted them. The same firmware update is now available on Pac-Audio’s support page. You can find the link at the bottom of this page. (As previously mentioned, you’ll need to own, or have access to a PAC-UP programmer to update the firmware.)

When Pete let us know that the issue was resolved, I spoke with Dean and immediately ordered the PAC-UP programmer from Amazon. When it arrived the next day, Greg and I went straight back to the shop and updated both of our modules.
 The update process is simple; download the software & firmware from their website, install the software and driver on a Windows based laptop, connect the PAC-UP module, launch the software, turn the car on, and follow the instructions. Updating the firmware on Greg’s module didn’t take more than 5 minutes…. because he extended the wires to his module and it was easy to get to. Getting to my module, on the other hand, took much longer because I had to remove the head unit. (I didn’t extend my wires.)
Learning the SWC programming process, and what each command would actually do, was far more time consuming than updating the firmware. Each SWC button can be programmed for 2 functions; a short press function and a long press function. Well, all but one. The button that activates OnStar/Voice can’t be programmed properly if OnStar is not disabled… and once it has been disabled, it can only be programmed for a single “short button press” function. (I’ll explain that a bit more in a moment.)
To disable OnStar activation via the SWC, you’ll need to download and launch the PAC Vehicle Settings software and change the “Map SWC” option to “Aftermarket”:

After OnStar has been disabled, you’ll have to learn the “program dance” and decipher the SWC functions outlined on page 6 of the RPK5-GM4101 instruction manual.
Here’s the quick version of the “program dance”; hopefully it makes more sense than what’s in the manual….
- Turn the vehicle key to the on position and wait for you head unit to boot up.
- Turn to page 6 of the instruction manual and find the “Optional Programming Order” chart.
(You’re going to start with 1 and work you way through 15, in order, skipping the functions you don’t want programmed.) - Press the “prog” button on the side of the PAC module; the SWC indicator LED will stay on. (you have 5 seconds to complete the next step)
- Short, or long press the SWC button you want to perform the “Volume +” command… because it’s the 1st command in the “Optional Programming Order” chart. (You’ll see the SWC indicator LED flash when the command is saved)
- Short, or long press the SWC button you want to perform the “Volume -” command… because it’s the 2nd command in the “Optional Programming Order” chart.
- Continue short or long pressing buttons until you have programmed or skipped all 15 SWC functions for you head unit.
Here’s an example and explanation of the whole “short press” / “long press” thing: After the module is in program mode, quickly press and release the Volume + button on the steering wheel. The SWC indicator LED will flash; this means that a quick press of the Volume + button will increase the volume on the head unit by 1. You can also program a second function to the Volume+ button if you press and hold it until the SWC indicator light flashes…. just remember, if you program 2 functions to Volume+, you won’t be able to press and hold the button to rapidly increase volume… a quick press of the button will increase the volume by 1 and a long press will activate the function you set to ‘long press’. If there is no “long press” function programmed to the Volume+ button, the command will be sent repeatedly to the head unit until you release the button.
I know, it’s still confusing, so I’ve created a complete example / cheat sheet for duplicating our Kenwood SWC settings. Simply put the module into program mode, look at the 3rd column of the chart below, then press the buttons on your steering wheel in the order listed.. The SWC indicator light on the PAC module will flash several times when programming is complete. Remember, to “skip” an unwanted function, simply press and release the SWC prog button on the side of the PAC module; it will flash to indicate that the function was skipped. If at any time you make a mistake, just stop pressing buttons and wait for the SWC indicator light to flash several times; then put the module into program mode and start over.
| Our chosen method of programming the SWC: *after updating the PAC module 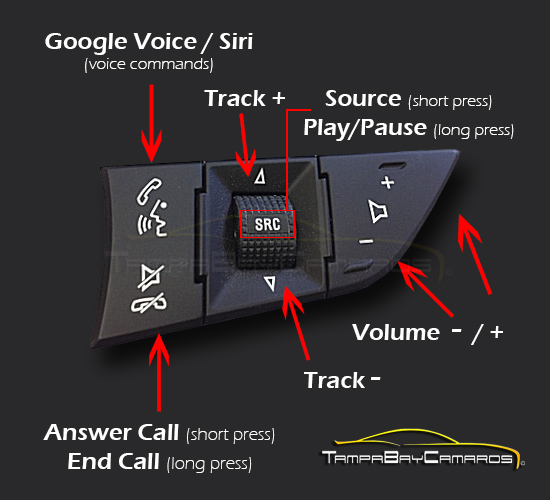 |
||
| ORDER: | Kenwood Function: |
SWC Button Programmed: |
|---|---|---|
| 1 | Volume + | Volume + (short) |
| 2 | Volume – | Volume – (short) |
| 3 | Mute | SKIP (PAC prog) |
| 4 | Source | SRC (short) |
| 5 | Play | SRC (long) |
| 6 | Track + | SRC up (short) |
| 7 | Track – | SRC down (short) |
| 8 | Disc/FM+ | SRC up (long) |
| 9 | Disc/AM- | SRC down (long) |
| 10 | Answer | SKIP (PAC prog) |
| 11 | Voice Dial | OnStar Talk (short) |
| 12 | On Hook | Mute/End (long) |
| 13 | Off Hook | Mute/End (short) |
| 14 | Mute (Multimedia) | SKIP (PAC prog) |
| 15 | Preset + | SKIP (PAC prog) |
Issues Found:
Missing CMX Modules: The initial of the RadioPro5 didn’t ship with the CMX chime module. When Pac-Audio was notified by customers, they immediately began shipping the missing modules to dealers and customers and the issue was quickly resolved. So if you’re missing the CMX chime module, contact Pac-Audio, or the authorized dealer to obtain one. Pac-Audio Support: 866-931-8021 or Support@aampglobal.com)
Lack of Bezel Illumination: The faceplate bezel illumination on my unit appeared to be working fine at first. When the headlights were turned on manually, it would illuminate just fine; it would do the same (most of the time) if the automatic lighting control was activated while I was driving and it became dark. What I have found, though, is that it wouldn’t illuminate during my early morning commutes to work, or during late night driving. What I learned was this; if the vehicle is started when it’s already dark outside, and the automatic lighting control was active, the kit didn’t seem to know that it needed to light up. After several frustrating commutes to work, and late night rides, I found a solution. If the kit isn’t recognizing that you interior lights are on, simply adjust the interior light dimmer brightness up and then back down and it should activate the the kit illumination. If you keep you dimmer set to the brightest setting, you’ll probably never experience this issue, but I keep mine fairly dim. Hopefully this will be resolved in a future firmware update, or product revision.
The Hazard Button: The hazard button is nearly impossible to use. When it’s pressed, nothing happens; it doesn’t feel like it presses in, nor does it activate the lights. Press the button a bit harder and it’s a bit hit-or-miss as to whether or not the hazard signals turn on. The only way to ensure the hazard signals turn on is to apply an unusual amount of pressure on the button; enough to make you think you’re going to break something. (Reliable sources tell us that the Pac-Audio engineers are working on revising the kit, and will most likely resolve the issue in a future release.)
Steering Wheel Controls (SWC): Unfortunately the firmware installed on the initial batch of PAC control modules contains a bug that prevents it from entering program mode. This means that you won’t be able to reprogram you SWC to suit you needs. After contacting Pac-Audio, and having one of their engineers work with a TBC member (Pete), and the installer from 5 Star Car Stereo (Dean), they discovered the cause of the issue and resolved the issue with a v2.08 firmware update. (note: PAC-UP Interface Updating Device is required to flash the module with the latest firmware. You can either purchase the device and updated it yourself, or ask your authorized Pac-Audio dealer for assistance.)
Useful links:
- RPK-GM4101 – Official Pac-Audio page for the RadioPro5 kit for all 5th Generation Camaro’s.
- Installation Manual
- RadioPro5 Firmware Update – v2.08 resolves the issue regarding steering wheel control programming.
- PAC-UP Interface Updating Device – required to update the PAC control module ($34.94 Amazon)
Final Thoughts:
Being an early adopter isn’t always the greatest experience, and sometimes we might feel like beta testers, but that seems to be the price we pay to have the “latest and greatest”. Even though there are several “bugs” to be worked out, and a few headaches that have to be tolerated until they’re resolved, the Pac-Audio RadioPro5 is still, by far, the best looking, and most complete, aftermarket solution available for the 5th generation Camaro; it’s also a solid performer after the firmware is updated and settings are tweaked. If you’re not willing to deal with the firmware issues, or the unimpressive button functionality, you should probably postpone spending your hard earned money on this kit…. at least until the next version is released.
Our hats are off to Pac-Audio for finally bringing this kit to market and for resolving issues as quickly as possible.
| 2011 OEM Head Unit (Before) | RadioPro5 Kit & Kenwood DDX9903S (After) |
|---|---|
 |
 |
Leave A Comment
You must be logged in to post a comment.